NVIDIA Jetson Orin Nano Setup: JetPack, SD Card & Fixes
Who is this guide for?
This guide is for developers, makers, and AI enthusiasts who want to set up a Jetson Orin Nano reliably and avoid common pitfalls. If you prefer practical, experience-based solutions over idealized documentation, this guide is for you.
I still see myself as someone on a learning journey in the field of artificial intelligence. I try to improve myself in this area and contribute as much as I can within my limits. I even mentioned this briefly in a rather high-level way in my post Working with Artificial Intelligence: What Can I Do as an Individual?.
In this post, I'll talk about setting up a device that will support me in my AI experiments.
What Is NVIDIA Jetson Orin Nano?
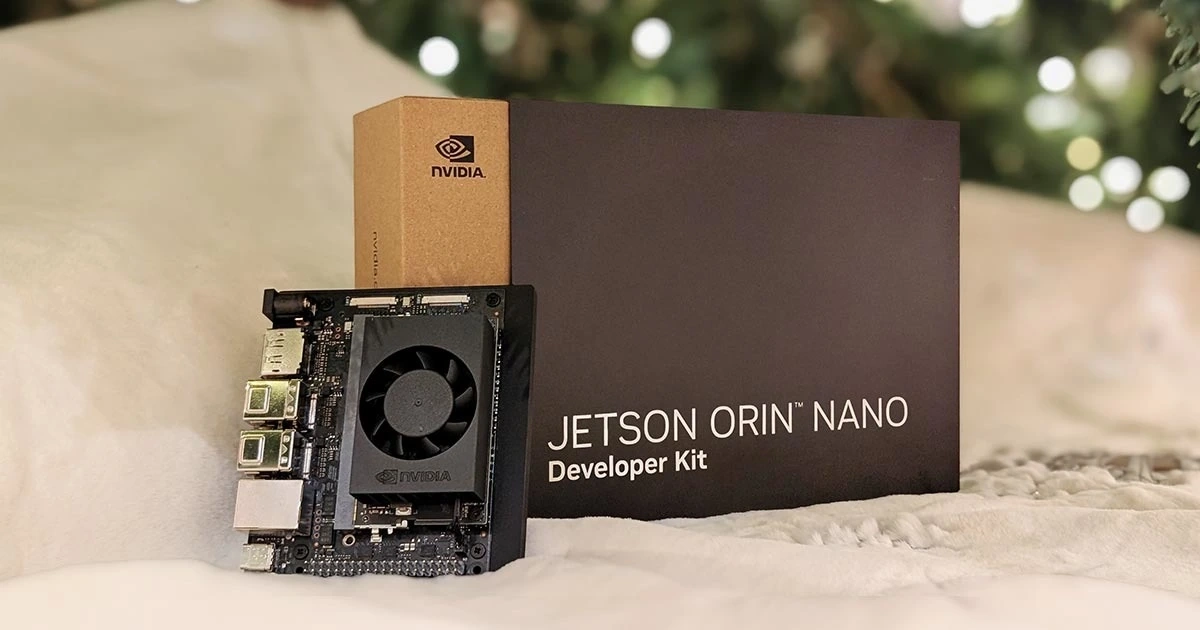
When we talk about artificial intelligence today, NVIDIA is usually the first name that comes to mind. Jetson Orin Nano is one of NVIDIA's products in this space. It's designed as an embedded computing platform with strong AI capabilities, aimed at both individual and industry-ready projects. Thanks to the CUDA and Tensor cores inside, it offers AI computing power that can even surpass many laptops or desktop computers. On top of that, its low power consumption and small size make it a great starting point for AI projects.
| Unit Name | Specifications |
|---|---|
| GPU | 1024 CUDA Cores |
| TPU | 32 Tensor Cores |
| CPU | 6-Core ARM Cortex-A78AE 64Bit 1.5MB L2 + 4MB L3 |
| Memory | 8GB 128Bit LPDDR5 102GB/s |
| Storage | microSD card slot and dual external NVMe support (Type 2230 & 2280) |
| Power | 7W–25W |
| Network | 802.11ac/abgn Wireless Network Interface Controller |
I bought the device, whose key features I listed above, in September 2025. I only recently found the time to work on it, and after a successful setup, I wanted to write this post right away.
For those who are curious, I bought the device from OpenZeka, the distributor of NVIDIA Embedded Systems in Turkey. When I checked the prices today, I didn't see a big difference compared to what I paid back then. They're selling it for almost the same price. When I bought it, I also got the developer kit together with an SSD. If you're planning to buy one, don't forget to check current prices and stock status.
Setup Prerequisites
During the setup, you'll need some technical knowledge and a few pieces of hardware. The most important ones are a microSD card of at least 64GB with a write speed of 100MB/s or higher, a display that supports DP 1.2, and a wired keyboard. Once you have these, there's basically no chance you won't be able to set it up. How do I know? I tried, and I managed to complete the setup with just these.
In addition, because I read various online sources, I also bought an HDMI cable, a USB-A to USB-C cable for data transfer, an extra microSD card, and a wired mouse. But in the end, I completed the setup using only the three items I mentioned above.
Jetson Orin Nano Setup (SD Card Method)
Since I expected this post to be long, I wanted to first share the information that will be useful for most people. After that, I'll talk about what I personally went through.
First of all, you need a computer, and it doesn't really matter which operating system is installed on it. On this computer, download and install SD Memory Card Formatter and balenaEtcher. These tools will help you write the appropriate operating system image to the microSD card that you'll insert into the device.
Next, download the JetPack version that is suitable for your device. You can think of JetPack as a custom distribution package developed by NVIDIA on top of Ubuntu, including NVIDIA SDKs and drivers. It also contains the firmware required for the device to work. That's why it's important to know which hardware version you have.
JetPack 6.2 vs 5.13: Which One to Use?
As a small tip, if your device was manufactured after January 2025, JetPack 6.2 will most likely work for you. But if you have an older device, you'll need to install JetPack 5.13 first and then upgrade to 6.2. Otherwise, you won't be able to use the 25W power mode on the device.
Side Note: My environment is Windows 10, and I run many virtual machines on my system using Hyper-V.
As the first step, I formatted the microSD card straight out of the package using SD Memory Card Formatter. Then I flashed the JetPack 6.2 image onto the card using balenaEtcher.
In the next step, I took the Jetson Orin Nano out of its box. I connected the power cable suitable for Turkey, a wired keyboard, and a display that supports DP 1.2.
On the first boot, a large NVIDIA logo appeared, followed by the usual Linux boot messages, and then the Ubuntu setup wizard showed up. After entering the required information, the installation was completed.
Reading this, it feels like everything happened very quickly, almost like it was done in ten minutes, right? In reality, reaching this point took me four days. I completed the setup on the evening of the fourth day. I plugged in the now-ready device and left it running an experiment that I'll talk about in future posts.
Issues Encountered During Setup
If all you need is to set up and use the device, the section above should be enough. But if you're curious about the struggles, here we go.
Before setting up a device, I usually check platforms like YouTube or Medium to see if there's any content about the setup process. Often, just reading the outcomes of other people's experiences is enough to move faster. But this time, it didn't work that way.
In the videos I watched and in NVIDIA's guides, two setup methods are mentioned. One is installation via microSD, and the other is installation via SDK Manager. Both have their own pros and cons, and I'd recommend using whichever fits your situation. But in short:
- SDK Manager installation can cause serious issues with a Windows + WSL + Hyper-V combination.
- Disk space can be insufficient in an Ubuntu Live environment.
- The most stable method turned out to be installation via SD card with an external display and keyboard.
I can summarize it like this.
| Criteria | SDK Manager | SD Card |
|---|---|---|
| External display required | No | Yes |
| Windows compatibility | Problematic | Smooth |
| Initial setup difficulty | High | Low |
| Recommended method | No | Yes |
Quick decision: If you have a display and a keyboard, go with the SD card method.
SDK Manager on Windows: WSL & Hyper-V Conflicts
When I made my first attempts, I didn't have an extra display or a wired keyboard. I didn't even have a proper USB cable for data transfer, but then I remembered that the charging cable I use for my phone also supports data. So I decided to try installing everything directly via SDK Manager, without requiring additional physical hardware.
SDK Manager is a tool provided by NVIDIA, where you log in using your NVIDIA Developer Platform account. With this tool, you can connect to your device externally and install firmware and the required SDKs.
To start the installation, a four-step wizard guides you through the process.
In the first step, you select the device and additional packages. You also choose the JetPack version suitable for the device.
In the second step, you select mandatory, recommended, and optional packages, and choose the directory where they will be installed.
In the third step, the selected packages are downloaded and prepared to be transferred to the device. At this point, you put the device into Recovery mode and start the flashing process. If everything goes well, the process finishes in about 20–25 minutes, and you move on to the final "you're good to go" step.
What I Went Through
Installing via SDK Manager seemed very reasonable to me. Especially without a display or an extra keyboard, I thought I could handle it without extra costs. I didn't see many clear warnings in the documentation, but in forums I noticed that many Windows users failed when trying to install via SDK Manager. Most of them said they eventually solved their problem, but almost none explained how.
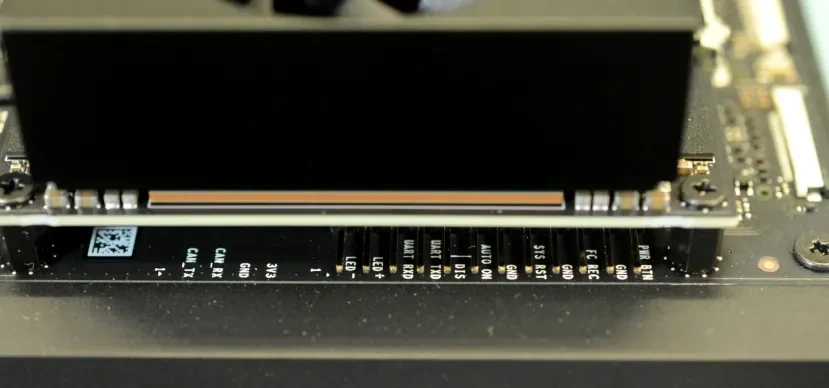 The first challenge I faced was related to short-circuiting pins to put the device into Recovery mode. When you hold the device with the ports facing away from you, there are 12 pins hidden under the cooling fan. To enter Recovery mode, the
 FC REC pin shown in the image above needs to be shorted with the adjacent GND pin.
While looking for a jumper at home among my computer parts, I found a bundle of male-female jumper wires in one of my PIC programming kits. I figured I could probably make a jumper out of those and kept going.
Just when I thought the problem was solved, SDK Manager told me that WSL needed to be installed. Since I already use Hyper-V for virtualization, I had never touched WSL before. But for this device, I went ahead and jumped in.
wsl --installI ran the command above, restarted the machine, and tried again. This time, I ran into a warning about an APX driver. While performing the installation, SDK Manager tries to connect to the device via WSL and uses VirtualBox USB drivers for this. However, since WSL can't directly use these USB drivers, an APX driver is needed in between. I somehow installed that as well and tried again. This time, the VirtualBox USB driver conflicted with Hyper-V.
Since I couldn't break my existing virtual machine setup, I decided to repeat all the steps on another Windows 10 machine that I wasn't actively using. But that machine was old and not fully updated, so SDK Manager asked me to complete the updates first. After doing that, I tried again. Still no luck.
While looking into the reason, I noticed in NVIDIA's guides that the recommended environment for SDK Manager is Ubuntu. With that in mind, I thought maybe I could try the installation from a live environment.
Using Rufus, I wrote the Ubuntu 22.04 Desktop image to another USB drive and booted my machine from it. Thinking that my RAM would be sufficient, I installed SDK Manager and started downloading. I connected the device in Recovery mode and started the transfer. After a while, the process failed with an insufficient disk space error.
Ubuntu Live CD had already used up most of the available space by splitting my RAM, so the installation didn't go as expected.
At that point, while considering formatting the other Windows 10 machine and installing Ubuntu on it, I thought it might be worth trying the other method as well.
Boot Order and NVMe Conflicts
While checking NVIDIA's guides, I realized that this was actually the method I should have followed from the beginning. But I really didn't feel like buying an external display, a wired keyboard, and a mouse. Still, once I accepted that there was no other way, I moved forward with this approach.
For this method, at minimum, you need a wired keyboard and a display that supports DP 1.2. If your display only supports HDMI, a simple adapter can also save you here.
Once you have the required hardware, it's enough to format the microSD card using SD Memory Card Formatter and then flash the appropriate JetPack image with balenaEtcher. But even this wasn't enough for me.
Still Didn't Work
First, I went out and bought a display. I wanted something small, but since the price was reasonable, I ended up buying a 24" monitor. I also bought a basic wired Turkish Q keyboard, just out of necessity. I didn't buy a mouse.
When buying the monitor, I kept asking the seller whether it had HDMI, because I thought the device had an HDMI port. Turns out it has a DP 1.2 port. Luckily, when I got home and turned on the monitor, I saw that it had a DP 1.2 input and even came with a cable. That was a relief.
Then, based on what I read online, I flashed JetPack 5.13 and JetPack 6.2 onto two separate microSD cards. My plan was to install using 5.13 and then upgrade to 6.2.
I inserted the JetPack 5.13 card, the display turned on, but right after that it got stuck on a black screen. I waited for a while, but nothing happened. I unplugged the power and tried again. Same result. After three attempts, I decided to try with JetPack 6.2. But the result was the same.
Then I remembered that I had connected an NVMe drive to the Jetson Orin Nano, and I thought it might be causing a boot issue. I booted again with JetPack 5.13 and this time entered the BIOS. Deep inside the menus (Boot Maintenance Manager > Boot Options > Change Boot Order), I finally found what I was looking for.
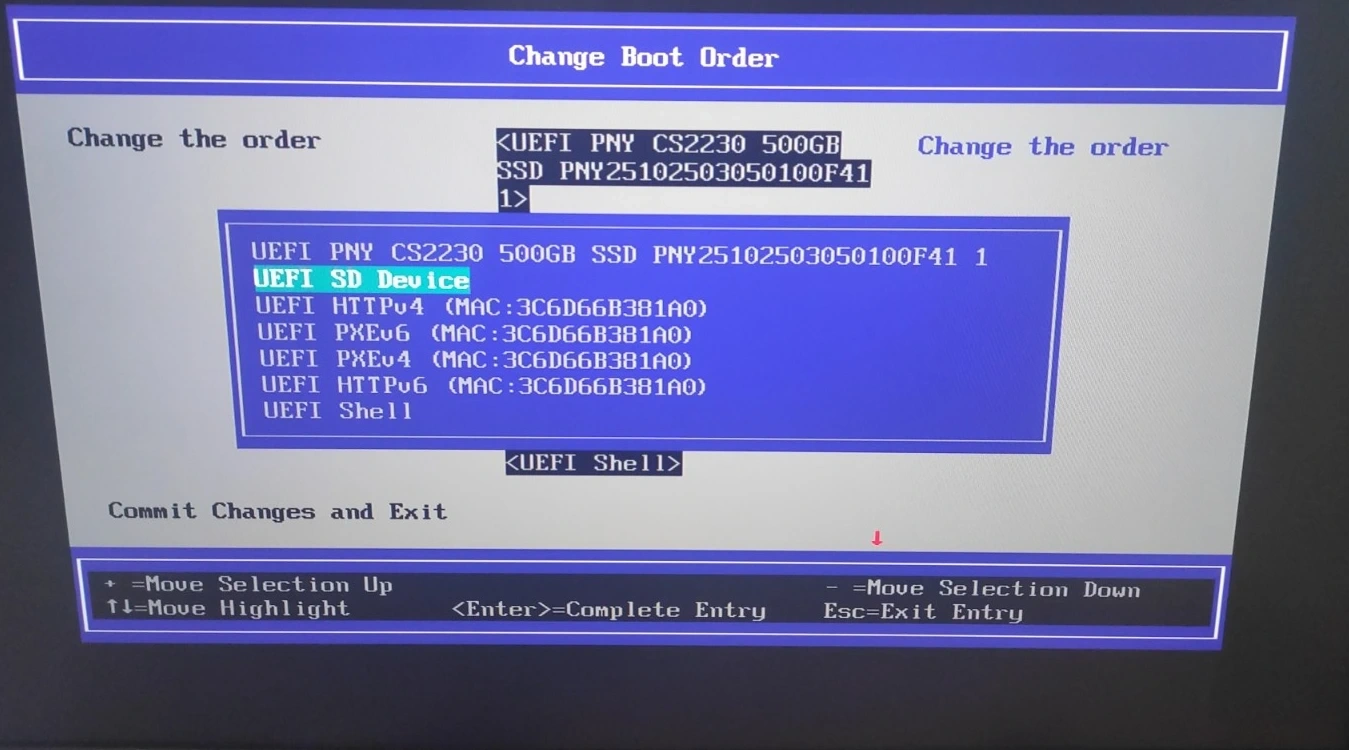
After updating the boot order, I tried again with JetPack 5.13. Based on my past experience, I thought even if it was an older version, it should still be supported. But apparently, it wasn't. I reached the boot screen again and looked around, thinking there might be some setting I missed.
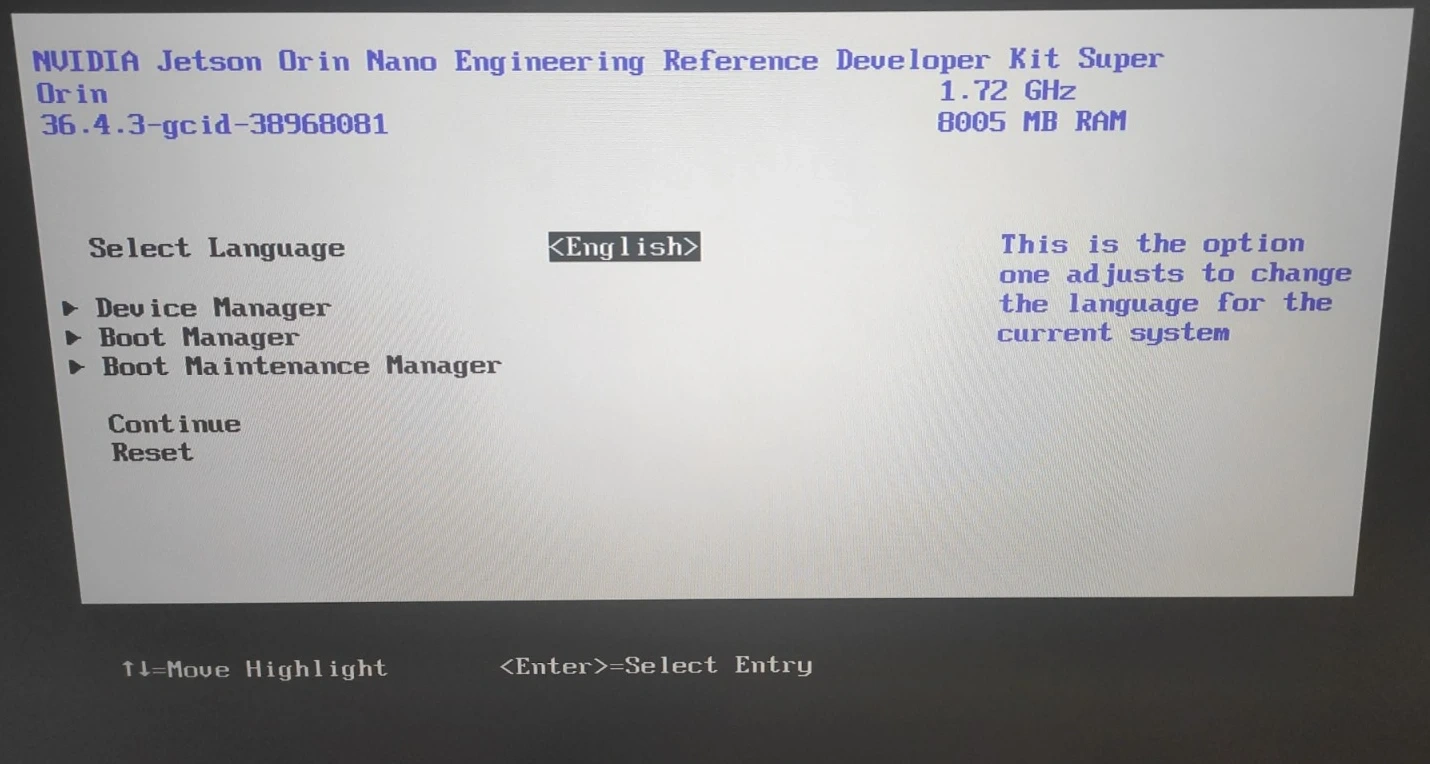
But when I saw the 36.4.3-... text at the top of the screen, JetPack versions came to mind. I immediately inserted the microSD card with JetPack 6.2 and booted the device.
After the Setup
After finishing the setup at the end of four days, my first task was to free the device from its dependency on a display and a wired keyboard.
As I do after every Ubuntu-based installation, I first checked the version information.
lsb_release -a
uname -r
From these commands, you'll get an output like this:
fatihtatoglu@tat-jetson:~$ lsb_release -a
No LSB modules are available.
Distributor ID: Ubuntu
Description:    Ubuntu 22.04.5 LTS
Release:        22.04
Codename:       jammy
fatihtatoglu@tat-jetson:~$
fatihtatoglu@tat-jetson:~$
fatihtatoglu@tat-jetson:~$ uname -r
5.15.148-tegra
fatihtatoglu@tat-jetson:~$
Then I started applying updates.
sudo apt update && sudo apt upgrade -y && sudo rebootHeadless Configuration (SSH & CLI Mode)
After that, I removed preinstalled applications that I didn't plan to use. Games, LibreOffice, gEdit, and so on. Instead, I installed the SSH server.
sudo apt install -y openssh-server
sudo systemctl enable ssh
sudo systemctl start ssh
systemctl status ssh
Since I would access the device remotely, I got its IP address using ip a, set it to static while I still had the screen connected, and made my first SSH connection.
If Ubuntu is installed with the Desktop version, it always boots into the graphical interface first, which costs me some time. To avoid that, I ran the command below.
sudo systemctl set-default multi-user.targetAt this point, the device was fully accessible remotely via SSH. But I still had a few more installations and configurations to do.
Python Installations
As you'll see in future posts, I'll be doing some development in Python on the Jetson Orin Nano. For that reason, I wanted to install some essential libraries in advance.
sudo apt install -y build-essential cmake git curl wget htop tmux pkg-config python3-dev python3-venv python3-pipI haven't installed AI-related libraries yet, but you'll see those in upcoming posts very soon.
Swap File on NVMe for Stability
Even though the Jetson Orin Nano is a powerful device, its memory is limited. Especially under heavy workloads like compilation, model downloads, or running LLMs, the system can become unstable without swap space. For this reason, I planned to use the NVMe drive and create a 16GB swap file on it.
First, while the display was still connected, I formatted the NVMe drive and created a partition using Disks. Then I got the partition's UUID using lsblk -f and added it to /etc/fstab.
UUID=abcd-1234-efgh-5678 /mnt/nvme ext4 defaults,noatime 0 2I created the mount point with sudo mkdir -p /mnt/nvme, ran sudo mount -a to test it, and verified it using df -H | grep nvme.
sudo fallocate -l 16G /mnt/nvme/swapfile
sudo chmod 600 /mnt/nvme/swapfile
sudo mkswap /mnt/nvme/swapfile
sudo swapon /mnt/nvme/swapfile
With these commands, I created the swap file.
echo '/mnt/nvme/swapfile none swap sw 0 0' | sudo tee -a /etc/fstabThis command ensures that the swap space is automatically enabled on every boot.
Installing and Configuring Ollama
After the setup, I wanted to use the device not just as a development board, but more like an AI service endpoint that can be accessed over the network. For this reason, I chose Ollama as a solution that can run LLMs locally and expose them externally.
curl -fsSL https://ollama.com/install.sh | shI installed Ollama directly using this command. Then, with the command below, I downloaded a small test model.
ollama pull tinyllamaIn my setup, the operating system will stay on the microSD card, and everything else needs to live on the NVMe drive. For this, I had to move Ollama's cache and model directories.
mkdir -p /mnt/nvme/ollama
sudo systemctl stop ollama
ln -s /mnt/nvme/ollama ~/.ollama
sudo systemctl start ollama
In addition, Ollama needs to be accessible from outside.
sudo vi /etc/systemd/system/ollama.serviceAfter opening the file with the command above, adding Environment="OLLAMA_HOST=0.0.0.0:11434" makes Ollama accept requests from anywhere.
sudo systemctl daemon-reload
sudo systemctl restart ollama
ss -lntp | grep 11434
curl http://127.0.0.1:11434/api/tags
Closing Thoughts
I managed to take one more step forward in the field of artificial intelligence with this move. This step, taken for new experiments and new experiences, was a bit exhausting, but I can still say that I made it.
That said, I do have some thoughts to share. In 2025, still having to set up a device using a display and a wired keyboard feels strange to me, especially for an AI-focused device. Raspberry Pi setups have been configurable for a long time with just a file placed on a microSD card, without even needing a screen. I would have expected a similar approach to become standard for AI devices at this level.
All in all, this turned into a personal story with a good ending. I now have a starting memory that I won't forget and can move on from. If you have similar experiences or if you've worked with Jetson Orin Nano before, I'd really like to hear about them.