
AWS Lambda to Google Sheets with Keyless WIF
Recently, I was part of a team developing a project for an AI startup. To speed up things, given the startup nature of the work, we purchased a boilerplate and built upon it with the necessary developments. We extended the boilerplate to fit our needs. The boilerplate provides the technical infrastructure needed by a startup on AWS, utilizing various AWS products. We also preferred to use AWS resources during the customization process. However, the boilerplate lacked any reporting structure - something we didn't expect when making our selection.
In short, we needed to transfer data from AWS sources to Google Sheets to create a dashboard. In this post, I'll explain in detail how we moved our data from AWS to a Google Sheets document. Instead of a complex ETL process, I chose a minimal approach using keyless identity federation, with data flowing to Google Sheets every 6 hours.
TL;DR
Let me say upfront what I'll be saying at the end: I'm connecting AWS and GCP using Workload Identity Federation. I have a Lambda function running every 6 hours that transfers data to Google Sheets. It's a fast and cost-effective solution.
Architecture (EventBridge -> Lambda -> WIF -> Sheets)
On the AWS side, a Lambda triggered by EventBridge obtains short-lived credentials from GCP's Workload Identity Federation (WIF) without using a permanent key, and writes data to the Google Sheets API. The diagram below summarizes this flow at a glance.
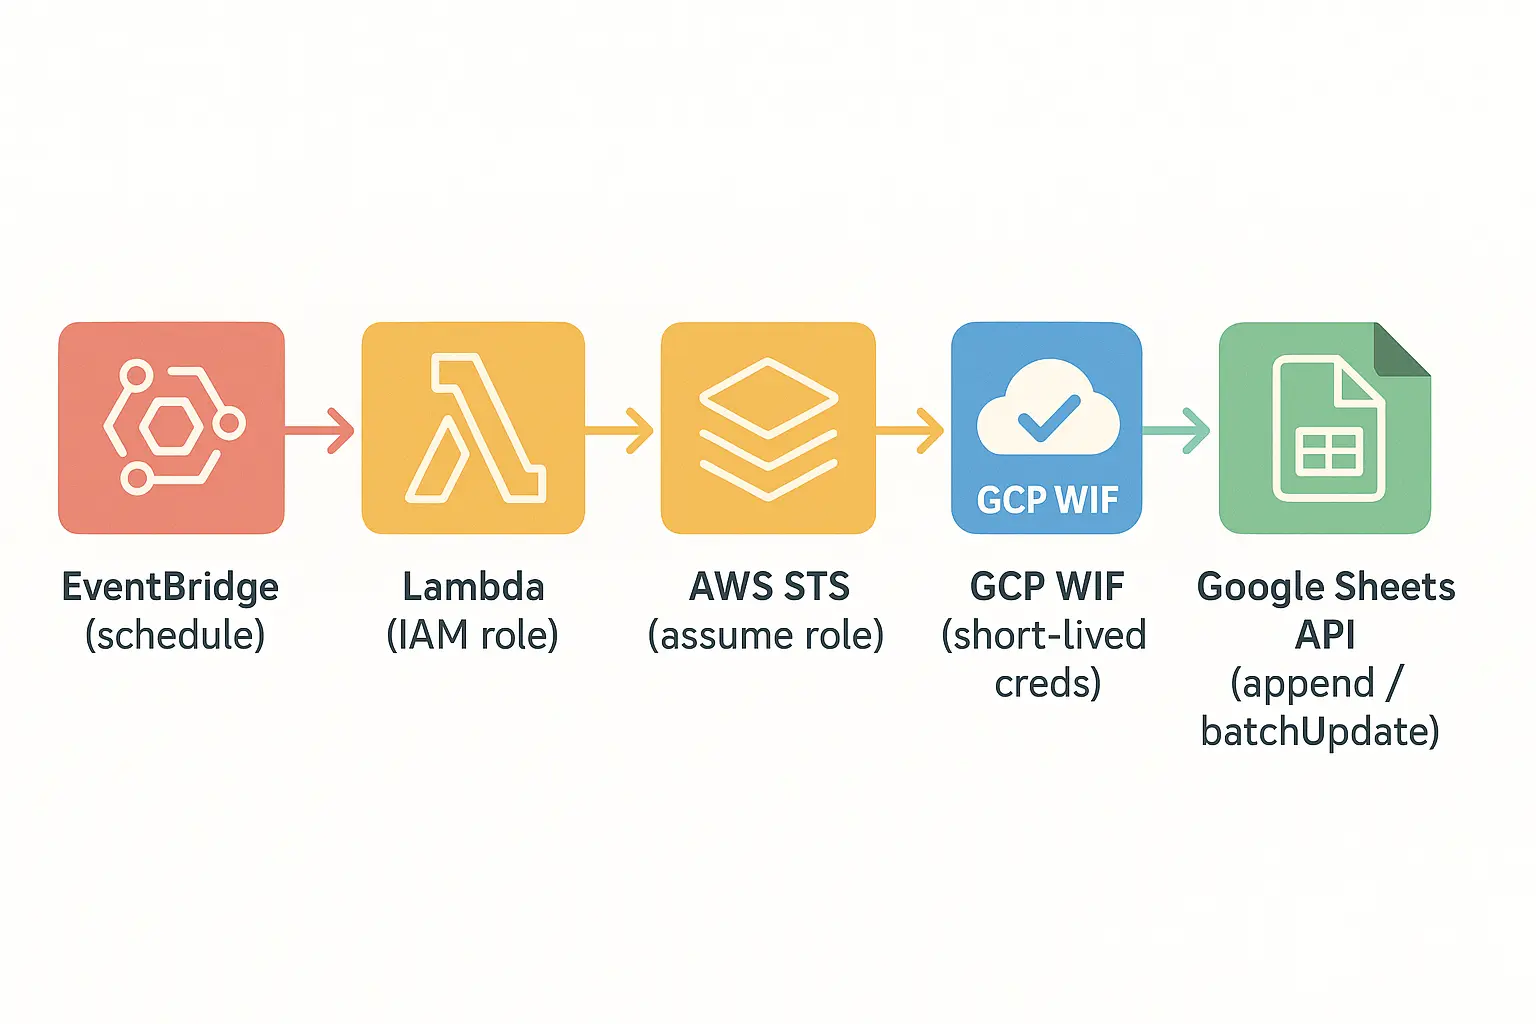
- Trigger: Lambda runs with EventBridge
rate(6 hours). - Computation: Lambda reads from DynamoDB/Cognito using an IAM role with read-only permissions.
- Identity Federation: The Lambda role is trusted to the GCP Workload Identity Federation (WIF) provider.
- Authorization: Lambda obtains a short-lived GCP credential via WIF and makes authorized requests to the Google Sheets API.
- Writing: Access/verification records are written to the
run_logtab, and metrics are appended to other tabs.
Why This Approach?
- Keyless and Secure: I'm not storing permanent GCP keys; I'm using identity federation and delegation for access.
- Fast Delivery: A lightweight solution tailored to the need, instead of setting up an ETL/warehousing system. Google Sheets provides sufficient visibility for the team.
- Cost/Operational Simplicity: A scheduled, easy-to-maintain, and low-cost flow using serverless (EventBridge -> Lambda).
Prerequisites
Before you start developing, take a look at the list below. You need to complete these items first; otherwise, you may encounter issues during the process.
AWS Requirements
I'm developing a Lambda function on the AWS side for this process. This function is triggered every 6 hours and writes data from DynamoDB and Cognito to different sheets in Google Sheets.
I will deploy the function to AWS using the Serverless Framework.
You'll need AWS credentials belonging to a user with sufficient permissions for all these operations. Additionally, as used in many AWS processes, AWS CLI v2 must be installed.
Google Cloud Requirements
The target destination for the data transfer is Google Cloud. A few settings are required on this side as well.
We'll open a service account on the Google Cloud Console. Then, we'll complete the WIF setup with this service account. Afterwards, we will use these credentials to enable writing data to Google Sheets.
Having administrator privileges in the Google Cloud Console is helpful for these operations.
Development Environment (Python)
The code was written using Python based on team expertise; I'll also provide examples using Python.
I'll share a boilerplate similar to the one we used, but not the exact same one, sometime later.
Setup Steps
The most important and essential point of data transfer is that AWS and Google Cloud can communicate with each other. We will ensure this first.
You decide which step takes precedence; I'm following the order I took.
Lambda Role and Scheduler
First, we create the Lambda function that will perform the data transfer. When creating the service, a general role is normally used; however, since we'll also be using Google, we're creating a specialized role for this Lambda function.
...
resources:
  Resources:
    DashboardCalculatorRole:
      Type: AWS::IAM::Role
      Properties:
        RoleName: ${self:custom.stage}-dashcalc-role
        AssumeRolePolicyDocument:
          Version: "2012-10-17"
          Statement:
            - Effect: Allow
              Principal:
                Service:
                  - lambda.amazonaws.com
              Action:
                - sts:AssumeRole
        ManagedPolicyArns:
          - arn:aws:iam::aws:policy/service-role/AWSLambdaBasicExecutionRole
          - arn:aws:iam::aws:policy/AmazonCognitoReadOnly
        Policies:
          - PolicyName: DashboardCalculatorPlatformRead
            PolicyDocument:
              Version: "2012-10-17"
              Statement:
                - Effect: Allow
                  Action:
                    - dynamodb:GetItem
                    - dynamodb:Query
                    - dynamodb:Scan
                  Resource:
                    - ${self:custom.platformTable.arn.${self:custom.stage}}
                    - ${self:custom.aiTable.arn.${self:custom.stage}}
                    - !Join
                      - /
                      - - ${self:custom.platformTable.arn.${self:custom.stage}}
                        - index/*
                    - !Join
                      - /
                      - - ${self:custom.aiTable.arn.${self:custom.stage}}
                        - index/*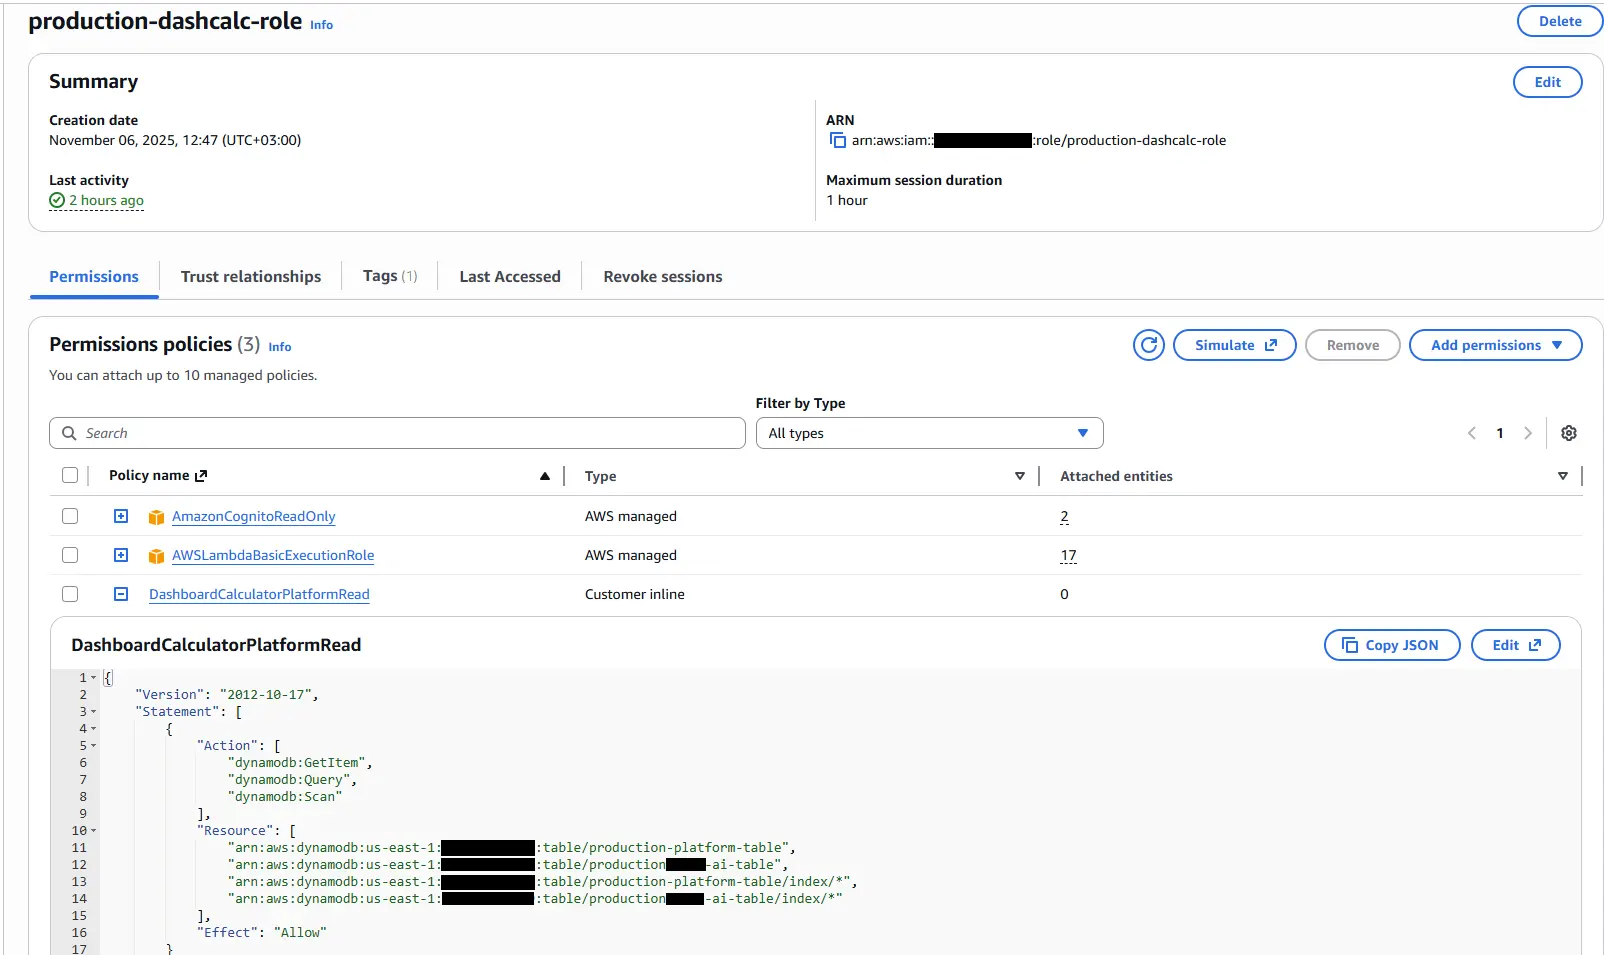
This role grants read-only access to Cognito and DynamoDB resources, considering the project's needs.
...
  dashboard_calculator:
    handler: src/dashboard_cron.handle
    name: ${self:custom.stackName}-dashboard-calculator
    memorySize: 512
    timeout: 180
    reservedConcurrency: 1
    maximumRetryAttempts: 0
    role:
      Fn::GetAtt:
        - DashboardCalculatorRole
        - Arn
    events:
      - schedule:
          rate: rate(6 hours)
          enabled: true
Because we're using a custom role instead of a general one, the Lambda definition also specifies this role.
After creating these definitions, I add my template code to the src/dashboard_cron.py file.
from typing import Any

from lib import utils_time as t
from lib.utils import get_logger


logger = get_logger()


def handle(event: dict[str, Any], context: Any) -> dict[str, Any]:
    t_start = t.utc_now()

    id = event.get("id", "")
    source = event.get("source", "")
    time = event.get("time", t.to_iso(t.utc_now()))

    params: dict[str, str] = {"id": id, "source": source, "time": time}

    logger.info(f"🚀 Let's start!!! {params}")

    result = execute()

    t_end = t.utc_now()
    t_elapsed = t_end - t_start
    logger.info(f"⏱️  Elapsed Duration: {t_elapsed.total_seconds()}")

    return result


def execute() -> dict[str, Any]:
    return {}
The requirements.txt file looks like this.
boto3
python-dotenv
After adding the code, I deploy the function.
serverless deploy --stage production --forceOnce this deployment is successful, run the following command to find the ARN value of the created role. This will be used shortly.
aws iam list-roles --output json | jq "{Roles:[.Roles[] | { RoleName: .RoleName, Arn: .Arn }]}" | jq -r ".Roles[] | select(.RoleName | endswith(\"dashcalc-role\"))"Use the following command for macOS and Linux environments:
aws iam list-roles --output json | jq '{Roles:[.Roles[] | { RoleName: .RoleName, Arn: .Arn }]}' | jq -r '.Roles[] | select(.RoleName | endswith("dashcalc-role"))'Workload Identity Federation (GCP)
After completing the AWS step, now it's time to make the settings on the Google Cloud side.
In this step, our first priority is to create a new project. If you are using an existing project, you can skip this step.
Project Creation
Open the project list and click the New Project button. On the opened page, enter a name for your project. Google creates a unique ID for your project. You can change this now by clicking on the Edit link; you won't be able to change it later.
Once completed, note down the project ID value somewhere.
Service Account Creation
Follow the path IAM & Admin -> Service Accounts or search for Service Accounts in the menu bar. This page lists service accounts for the selected projects.
Click the Create service account button to create a new service account. During this process, enter a name for the service account and Google generates a unique service account ID. It also creates an email address with the format @<project_id>.iam.gserviceaccount.com. You'll need this email address; make a note of it.
After entering the information, click the Create and Continue button. In the Permission section:
- Editor
- Workload Identity User
Check these options and click Continue. Complete the last step with Done.
Workload Identity Federation
This is a service structure that eliminates permanent access keys and enables just-in-time authorization, common in most cloud providers. We will use this structure in our AWS connection.
First, you need to create a Workload Identity Pool.
Click the IAM & Admin -> Workload Identity Federation link or search for Workload Identity Federation in the search bar.
You may see a Get Started button; click it. If not, select New Pool from the Add Provider option.
Enter a name for the pool.
Select AWS from the Add a provider to pool list. Enter a name for the provider and then enter the AWS Account ID value. If you don't know this, run the following command to find it:
aws sts get-caller-identity --query Account --output textEnter this value and click Continue to go to the Configure Provider tab. You don't need to do anything extra here; just click on the Edit Mapping link to be sure.
You should see a table like this:
| AWS | |
|---|---|
| attribute.aws_role | assertion.arn.contains('assumed-role') ? assertion.arn.extract('{account_arn}assumed-role/') + 'assumed-role/' + assertion.arn.extract('assumed-role/{role_name}/') : assertion.arn |
| google.subject | assertion.arn |
Service Account Workload Identity Pools Definition
We have a service account and a Workload Identity Pool definition on the Google Cloud side. Now we need to connect them.
Go to the details of the pool you created and click the Grant Access link. On the opened page, select the option Grant access using service account impersonation.
Select the service account you created from the list and select the aws_role value from the Select principals list and enter the ARN value of the role defined in AWS into the adjacent field.
Now the bridge between AWS and Google Cloud is established.
Credentials
After the bridge is built, I need to return to AWS and complete the remaining connection steps.
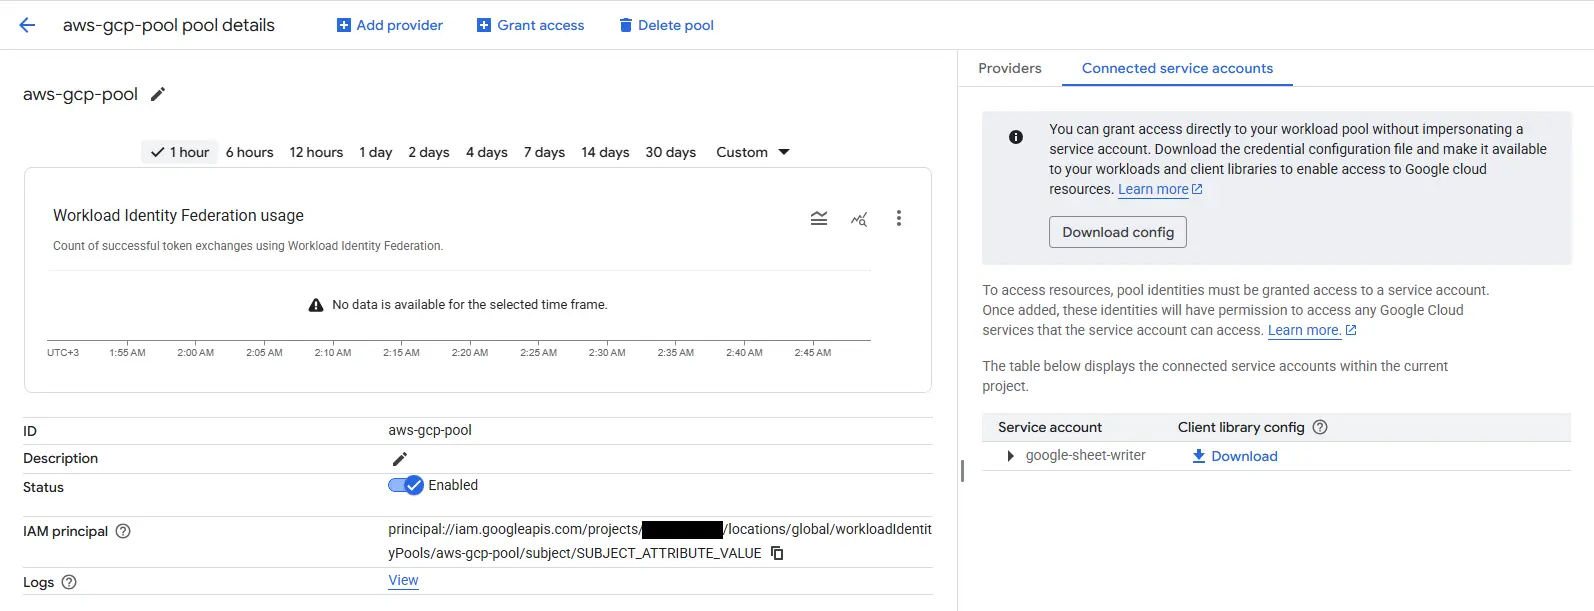
For this, you will see a Connected service account tab in the details of the Workload Identity Pool. Click on this tab and download the configuration file.
{
  "universe_domain": "googleapis.com",
  "type": "external_account",
  "audience": "//iam.googleapis.com/projects/<project-id>/locations/global/workloadIdentityPools/aws-gcp-pool/providers/....",
  "subject_token_type": "urn:ietf:params:aws:token-type:aws4_request",
  "service_account_impersonation_url": "https://iamcredentials.googleapis.com/v1/projects/-/serviceAccounts/<service-account-name>@<project-name>.iam.gserviceaccount.com:generateAccessToken",
  "token_url": "https://sts.googleapis.com/v1/token",
  "credential_source": {
    "environment_id": "aws1",
    "region_url": "http://169.254.169.254/latest/meta-data/placement/availability-zone",
    "url": "http://169.254.169.254/latest/meta-data/iam/security-credentials",
    "regional_cred_verification_url": "https://sts.{region}.amazonaws.com?Action=GetCallerIdentity&Version=2011-06-15"
  }
}
It should be like the above JSON.
Sheets API Authorization
After completing the definitions, let's move on to the last connection step.
In my scenario, the data from AWS was planned to be transferred to a fixed Google Sheets file. Therefore, all I needed to do was authorize the service account email address as an Editor in that specific Google Sheets. This enabled a one-to-one connection.
I also recommend you proceed with this security consideration in mind. If other services are needed, add them as well.
Writing to Sheets from Lambda
I initially defined the function earlier; my goal at that time was for the custom role to go live.
Now I'm going to complete the last connection step.
import base64
import json
import os
from typing import Any

from lib import utils_time as t
from lib.config import get_env_var
from lib.utils import get_logger

from google.auth import aws
from google.auth.transport.requests import AuthorizedSession, Request

logger = get_logger()

GOOGLE_EXTERNAL_ACCOUNT_ENV = "GOOGLE_EXTERNAL_ACCOUNT_JSON"
GSHEET_ID_ENV = "GSHEET_ID"
GSHEET_RUNS_TAB_ENV = "GSHEET_RUNS_TAB"


def handle(event: dict[str, Any], context: Any) -> dict[str, Any]:
    t_start = t.utc_now()

    id_ = event.get("id", "")
    source = event.get("source", "")
    event_time = event.get("time", t.to_iso(t.utc_now()))

    params: dict[str, str] = {"id": id_, "source": source, "time": event_time}
    logger.info(f"🚀 Let's start!!! {params}")

    result = execute()

    t_end = t.utc_now()
    t_elapsed = t_end - t_start
    logger.info(f"⏱️  Elapsed Duration: {t_elapsed.total_seconds()}")

    return result


def execute() -> dict[str, Any]:
    try:
        credentials = _load_google_credentials()
        credentials.refresh(Request())
        session = AuthorizedSession(credentials)
    except Exception as exc:
        logger.exception("Failed to authenticate with Google Sheets")
        return {"status": "error", "message": f"Google auth failed: {exc}"}

    spreadsheet_id = os.getenv(GSHEET_ID_ENV, "").strip()
    if not spreadsheet_id:
        return {"status": "error", "message": f"Missing env var {GSHEET_ID_ENV}"}

    sheet_name = os.getenv(GSHEET_RUNS_TAB_ENV, "run_log").strip() or "run_log"

    try:
        _ensure_sheet_exists(session, spreadsheet_id, sheet_name)
        note = f"{t.to_iso(t.utc_now())} - access verified"
        _append_col_a(session, spreadsheet_id, sheet_name, note)
        logger.info("✅ Accessing Google Sheets and writing was successful.")
        return {"status": "ok"}
    except Exception as exc:
        logger.exception("Google Sheets write failed")
        return {"status": "error", "message": f"Sheets write failed: {exc}"}


def _load_google_credentials() -> aws.Credentials:
    raw_config = get_env_var(GOOGLE_EXTERNAL_ACCOUNT_ENV)
    config_str = raw_config.strip()
    if not config_str:
        raise ValueError(
            f"{GOOGLE_EXTERNAL_ACCOUNT_ENV} is set but empty; cannot build Google credentials"
        )

    if len(config_str) >= 2 and config_str[0] in {"'", '"'} and config_str[-1] == config_str[0]:
        config_str = config_str[1:-1].strip()

    if not config_str.startswith("{"):
        try:
            config_str = base64.b64decode(config_str).decode("utf-8")
        except Exception as exc:
            raise ValueError(
                "Google external account config must be JSON or base64-encoded JSON"
            ) from exc

    try:
        config = json.loads(config_str)
    except json.JSONDecodeError as exc:
        raise ValueError("Invalid JSON in Google external account config") from exc

    return aws.Credentials.from_info(
        config, scopes=["https://www.googleapis.com/auth/spreadsheets"]
    )


def _ensure_sheet_exists(session: AuthorizedSession, sheet_id: str, sheet_name: str) -> int:
    metadata_url = (
        f"https://sheets.googleapis.com/v4/spreadsheets/{sheet_id}"
        "?fields=sheets(properties(sheetId,title))"
    )
    resp = session.get(metadata_url)
    resp.raise_for_status()
    sheets = resp.json().get("sheets", []) or []
    for sheet in sheets:
        props = sheet.get("properties", {})
        if props.get("title") == sheet_name:
            return int(props.get("sheetId", 0))

    batch_update_url = f"https://sheets.googleapis.com/v4/spreadsheets/{sheet_id}:batchUpdate"
    body = {"requests": [{"addSheet": {"properties": {"title": sheet_name}}}]}
    add_resp = session.post(batch_update_url, json=body)
    add_resp.raise_for_status()
    replies = add_resp.json().get("replies", [])
    props = (replies[0] or {}).get("addSheet", {}).get("properties", {}) if replies else {}
    sheet_id_value = props.get("sheetId")
    if sheet_id_value is None:
        raise RuntimeError(f"Failed to retrieve sheetId for sheet {sheet_name}")
    return int(sheet_id_value)


def _append_col_a(session: AuthorizedSession, spreadsheet_id: str, sheet_name: str, value: str) -> None:
    rng = f"{sheet_name}!A:A"
    url = (
        f"https://sheets.googleapis.com/v4/spreadsheets/{spreadsheet_id}"
        f"/values/{rng}:append?valueInputOption=RAW&insertDataOption=INSERT_ROWS"
    )
    body = {"values": [[value]]}
    resp = session.post(url, json=body)
    resp.raise_for_status()
The requirements.txt file looks like this.
boto3
python-dotenv
google-auth
requests
When you add this code to the Lambda function and deploy it, the connection will be completed.
Now you can transfer any data you want to Google Sheets and then create a dashboard as desired.
Security Recommendations (Least Privilege, Secrets, IAM)
It would also be useful to detail the security aspect of this integration. My aim is to explain why I chose WIF and Lambda from a security perspective.
First of all, I recommend using Workload Identity Federation regardless of whether you have an individual or corporate GCP setup. This eliminates the risk of permanent access keys and provides a more secure integration.
In addition, defining a custom role for Lambda allows easy inspection of the connection in case of problems and prevents unnecessary permissions from being granted to other services. Furthermore, defining this role with only the necessary permissions supports the least privilege principle. Instead of an admin user, prefer a IAM user/role with only the required permissions; the Lambda's role is already for read-only access.
Finally, storing the configuration files used for access in Secret Manager provides additional security.
Troubleshooting (Limits, Dependencies)
Here are some issues I faced and their solutions while making this integration:
Role Name Length
When defining the role while creating it, I was writing a long role name using the environment and name of the project. This caused me to hit a limit.
The maximum length of a role name in AWS is 64 characters. Because my initial definition was arn:aws:iam::<aws-account-id>:role/production-projenin-adi-backend-servisad-dashboard-calculator-role, I shortened it to arn:aws:iam::<aws-account-id>:role/production-dashcalc-role.
GCP Key Length
After solving the first problem, I encountered a limit on the Google Cloud side. This limit was that the google.subject key in the Workload Identity Pool definition could only accept a maximum of 127 characters.
To solve this, I shortened the role name to arn:aws:iam::<aws-account-id>:role/production-dashcalc-role.
requests Library
I completed the development on Lambda and ran it. I saw an error in CloudWatch: missing requests library. I had overlooked that the google-auth library has a dependency on requests; therefore, I received an error.
The problem was resolved by adding it to the requirements.txt.
Closing Remarks
I wanted to address a need that I often didn't pay much attention to (or often used with SQL-based databases) with a simple and suitable solution. In the end, creating a dashboard for the metrics needed by the project has been beneficial for both the startup and me.
I've been able to meet the needs so far despite lacking the AWS and Python knowledge I thought I had when starting this project. I'm happy about that. I hope it is useful to you as well.
If you would like to contribute, you can share how you would meet a similar need, share your experiences in the comments if you have a similar setup, forward this article to people you want to read, or leave your likes and comments.